With our drag and drop composing tools, designing your app is really easy. However, you may need to read a few things to master our tools.

1. The Basics

To compose an app with our “Design Your App” tools, you may add and configure different options, content elements and plugins. It’s important to learn the difference between them.

  • Options change the configuration of the app in some way, but don’t display any content. For instance:’Background’ is an option, changes the background color/image of the app.
  • Content Elements display clickable elements inside the app, these elements will display some sort of content.For example: ‘Feed’ is a content block. If fetches a RSS Feed and adds it into the app
  • Plugins are options designed by users or third parties that can act both as ‘Option’ or as ‘Content Element’. You will find further information about each plugin on the documentation.

    2. Adding Content

    To add Content Elements or Options you only need to find the following screen (Fig. 1). You can select the content of your choice both in the ‘Shortcuts’ section or in the ‘Dropdown Menu’.

    When an element is selected, a popup will open asking you to fill some details. If the option doesn’t require any configuration will be added directly to your app.

    Fig. 1. Adding the content.
    Fig. 1. Adding the content.

    3. Where’s The Content?

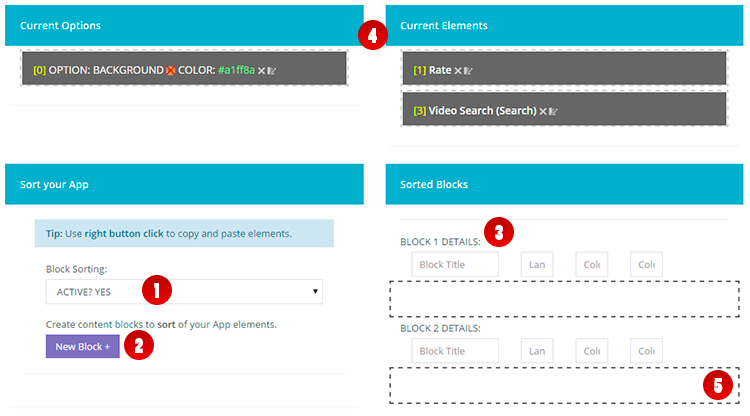
    When we add an option or a content element, these are placed in a pile under the “Drag & Drop” section. Here we can edit, delete or sort them. There are three positions on this sections.

  • Current Options (1) stores all options that are activated at this moment. These cannot be sorted because they don’t print anything.
  • Current Elements (2) stores all content elements that are activated at this moment. Elements located on this pile are ordered by default. To change set a custom order you must use the next section.
  • Content Blocks (3) is used to sort or order the content elements in a custom way. We can add blocks by clicking the button and move the elements in the position we want it.
  • Fig 3. Where is the content?
    Fig 2. Where is the content?

    4. Editing/Deleting Content

  • To delete items you must find the [X] icon close to the element/option you want to delete. Marked with (1) in the figure below.
  • To edit items you must find the [EDIT] icon close to the element/option you want to edit. Marked with (2) in the figure below. NOTE: not all elements are editable. If the element is editable, a popup will prompt to fill the details.
  • Fig. 3 : Editing/Deleting Content.
    Fig. 3 : Editing/Deleting Content.

    5. Sorting the Content

    By default, Content Elements are sorted by groups (i.e. videos will be sorted together, social buttons together, etc.). If you want to change this, you can use the Content Blocks section that appears below.

  • Don’t forget to activate the Block Sorting first! (1)
  • Click the “New Block” button to add a new section (2)
  • Fill the details of the new section. (3)
    • Title: header title for the block (i.e. Funny Videos).
    • Language [BETA]: in multilanguage apps, you can define different blocks that will only appear to users using that language. Enter two letter language codes (ISO 639-1)
    • Colours: Our system is compatible with jQuery mobile themes. Insert a letter from ‘a’ to ‘d’ to change the color within the current palette.
  • Drag and Drop the elements on the Content Elements zone (4) to any gap in the Blocks Area (5).
    Fig. 4 : Sorting the elements.
    Fig. 4 : Sorting the elements.
  • Leave a Reply

    Your email address will not be published. Required fields are marked *